Today my buddy Tork told me that I should take up needlepoint. As if I don't already have a craft that I can use to construct completely sweet things he can't even figure out. Yeah, needlepoint is cool, but I can only concentrate on so much at once.
Besides, crochet allows me to make awesome things.
Recently I created the Awesomest Thing I Ever Made. It has even unseated the previous Awesomest Thing I Ever Made, which you haven't seen since I never got around to taking pictures of it.
I got a couple of pictures of the new thing, though. This, in case you can't tell, is a cat tunnel. I bought five 11 (or so) inch brass rings and crocheted around them to construct this thing for my cats to run though.
This wasn't my idea, by the way. I got it from pictures of one that somebody else posted. The "pattern" I used* recommended 9" rings, but my cats are fatasses and I didn't really see how they'd be comfortable in a tunnel that small. I think the size rings I got came out just about right.
*I looked at a pattern, but you don't really need one for this. If you have any experience with crochet you can do it. There are 14 rows between each ring, alternating half double crochet and double crochet. That's about as much pattern as you need, and that much structure isn't even necessary.
So I made this thing over the course of many weeks and finally set it out for the cats fully expecting them to ignore it forever.
Two of them did.
But sweet dumb Felix decided to make it his second home.
Sorry about the censor bar. My blog is cursed. Pets whose pictures I post tend to disappear forever. I like having Felix around, he appreciates my art, so I had to take steps.
I'm really happy with how this came out. It used up a lot of scrap yarn that I had lying around (much of this yarn was remainders of previous projects featured on this blog) and got to make a cool place for Felix to hide from my dog. It's really awesome and I'd recommend this project to any cat owner who crochets.
Wednesday, November 19, 2008
In Your Face, TorKnocker
Wednesday, August 20, 2008
I made a cake!
It's my dad's birthday today, so I baked him a cake. This one is different than the cakes I usually make, though. This time I wanted to break out the bucketloads of food coloring and attempt a rainbow cake.
I made the cake batter itself from a boxed mix. It was lemon cake mix because lemon is my favorite kind of cake. (Dad probably would have preferred chocolate, but it's hard to dye a chocolate cake and make the color show up.) I knew I'd be working against the yellow of the original cake batter going in, but boy howdy! Betty Crocker uses some heavy duty damn food coloring in her cakes! She does NOT want you screwing around with the colors!
I did anyway. I also made a huge mess doing it. It was fun.
I told wurwolf about it and she told me to take pics, so now you get to see me frosting this cake.
Yeah, I'm frosting these on the washing machine. Behold its ancientness. The kitchen is pretty small and kind of a mess and there wasn't room.
That cake on the right looks pretty scary, I know. Some colors weren't meant to be golden, brown, and delicious. Green is one of them.
Eww. And so is purple. The cake is fine, though! It's just the food coloring! There is no mold present in this cake! I just baked it today!
The other layer looks much better as it is where I stored my warm colors. The greenish bluish purplish layer goes on the bottom.
Though the cake came from a boxed mix, the frosting was made from scratch. I don't cotton to canned icing. This stuff is just butter, a LOT of powdered sugar, a little vanilla, lemon zest, and enough lemon juice to make it spreadable. It's good stuff. I considered making the frosting some unholy color, but I figured there were sufficient weird colors involved already.
Middle part frosted!
Top layer is on! I know that you're supposed to put the top layer on upside-down to make the top flatter. Hell with that. It's too easy to tear up the top of the cake that way. Besides, the colors would show up in the wrong order if I did it that way. (Assuming they show up at all... I won't know if this worked until the cake is cut. This is scary.) The idea is you put a TON of frosting on top, and then push it over the sides to frost them.
I'm not left handed. I was only holding the spatula in my left hand so I could take the pic with my right. I knew you were wondering. Over the side it goes! Now to smoosh it around there!
 ALWAYS remember to dip your mp3 player in your frosting! THIS IS A VERY IMPORTANT STEP, PEOPLE!!
The cake is pretty well frosted, but I still have a lot of icing left. On it goes.
(I learned long ago that "Holy shit that's a lot of icing!" is way better than "Dammit, I ran out of icing and now I have to make more!" The icing recipe I've always used never makes quite enough to frost a whole cake. Doubling it yields way too much. It's better than trying to figure out the numbers for one-and-a-halfing it, though.) Mmm. More for the cook. (And you guys can totally have some, too. Totally.)
 Pull the parchment out of the bottom and I'm done! Hooray!
 As important as the cake itself is the Cake Barricade. This is a vital ingredient that keeps your cake from being devoured by roaming packs of wild dogs (or one determined poodle). I'd say we lose at least one cake a year to poor guarding and bad dogs.
So... You want to see this thing cut open?
Me too!
But it's pretty rude to cut up a birthday cake when the birthday person isn't present and ready to eat, even if you did make the cake yourself. You'll have to wait. It is only at the moment that I slice this thing that I will discover if my experiment worked.
I can hardly wait!
UPDATE:
It's a few hours later now, and we've cut the cake. Let's see what we've got!
This is a special cake cutter dealie some lady gave me. It's not really worth it most of the time, but it does help me with those First Slice Jitters. That first slice always comes out crappy! Ok, we've got a few pieces out of there and check it out! Looks good, especially when you think about how scary it looked without the icing and all. That's not icing dribbling down the middle. Well, it is icing, but it's not dribbling down. There's a crack in the cake and it's just in there. Whoever gets the piece with the icing trench is the winner of the cake!
 I pretty much got the effect I was hoping for. The six colors go down in layers in the proper order from red to purple. I could have swirled them together, but I wanted to see how it would turn out this way. I'd have liked the layers to be a bit flatter and more even, but I'm cool with the wavy effect, too. I'm just glad the colors didn't bleed together!
So there you have it! I'm going to consider this cake a success. By the way, wurwolf and I were talking about whether my Dad would appreciate all the extra effort that went into the colors and stuff. I can tell you that, as expected, Dad's reaction to this cake was the same as Dad's reaction to every other cake I've made him, whether it was good or disasterous:
Hey! Cake!
Wednesday, March 26, 2008
My Grandmother had a Cat Named Socks
He was a real booger, too.
(By the way, I'm testing out a new blog editor, so things may or may not look or act weird. So if the blog's screwy, this is why.)
So the title is just a "clever" way to say I made some socks. I've made them before, and always planned to make more. Now I've finally gotten around to it. Both pairs I'm showing you today I made while at school. It's a convenient time to make smallish things.
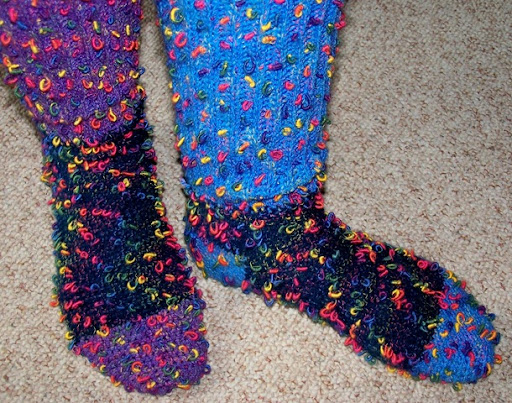
The first pair is the project I mentioned before, that used horrible atrocious yarn. Take a look at the finished product:

Scary, huh? I think so. But as I told my horrified students, (the sensible ones were horrified, anyway, there's always one or two who will say, "I think they look awesome!") it's not like I'm planning to wear them to the Queen's Garden Party. They're slipper socks to wear around the house, pretty much, and they work fine for that.
Making these socks was mostly pretty straightforward. I do have one nit to pick, and that's that the people who wrote the pattern are under the impression that women do not have calves. The cuffs go in a straight tube up from the ankles leaving no room for the natural curve of a woman's leg. Yes, the stitch used on the cuff is stretchy, but it's not that stretchy. It took me a long time to finish these socks because I knew if I just stitched up the cuff like I was supposed to I'd never be able to wear them, and I was undecided on how to go about solving my problem. I thought about a couple of options with creative lacing and whatnot, but in the end I just went back in with my hook and added to the cuff. They're pretty comfortable, now.
The little colored thready worm looking things are a part of the yarn, lest you think (like some of my students did) that I went in with a needle and thread and added each one individually by hand.
 As you can see, it's just regular yarn and there's this colored thread in there that every so often emerges in this brightly colored protrusion.
It seemed like a good idea when I was buying it, and I'm sure this kind of yarn has its place in the world, but it didn't thrill me while I was working with it. Not great sock material. As I mentioned in my previous blog entry, I was in a hurry the morning I decided to use this for my new sock project.
I know those thread tumors look like they'd be uncomfortable to wear, but fortunately they seem to naturally form on one side when you're crocheting in the round. You just have to make sure that side is the outside. Observe:

That's the inside of my sock, and while I had yarn maggots appearing on the inside of the cuff, on the darker part where I was crocheting in the round they all stayed on the outside where they belong. These socks are pretty comfortable as long as I don't do lots of marching around in them, which I wouldn't because look at them:
And now, to prove that I'm capable of making things that are not horrible, my other pair of socks:

I absolutely love the yarn I used, though it's too expensive for me to make anything big out of. It's even more colorful than what you can see in these pictures, with the yarn being made up of three strands of differently colored variegated yarn that nevertheless seems to work together to make a nice rainbow effect. The pattern goes for so long, though, that you can go through a whole ball of yarn and not get back to the color you started with. This can make it hard to change yarn seamlessly, as you can see in the toe of the right sock and just after the heel in the left sock.
(I still had plenty left in my yarn ball when I changed yarns for that left sock, but it was all coming out so dark and so... green! I wanted something brighter and with less greens in it. And then the new skein, after being nice and orange for a few rows, had to go right back to the green again. Doh!)
This is awesome yarn, even if the skeins never match even when they come from the same dye lot. You should buy some:

True story. My 12-year-old (half Mexican) cousin was feeling all full of himself and snarky, as 12-year-olds often do. He asked me to show him what I was working on and looked at the yarn and we had this conversation:
The Boy: Eww! Your yarn smells!
Me: That's because it's Mexican!
The Boy: Um... I was just kidding. It doesn't actually smell. I was just saying that.
Ha! That's how you put an insecure adolescent who is testing out his sense of humor to get a feel for what's funny for the first time in his place!
The yarn isn't actually Mexican, by the way. The label says it was manufactured in South Africa, so I guess in a way I just played Sun City. I love these socks.
 I used the same pattern on these that I did on the other socks. This time, though, I knew ahead of time that the cuff would be a bastard. In order to fix the problem before it became a problem, this time I made the cuff shorter. It's only half as long as the pattern tells me to make it, and so these socks fit perfectly.
As a side note, I never tried these socks on until I was taking the pictures for this blog entry. They fit really well, though, and I'm still wearing them right now.
Socks!
Read more!
Thursday, December 06, 2007
A Visit from the Yarn Fairy
Today you get two Two TWO updates for the price of one!
I'm sure you're excited.
First off, I'm going to tell you about something that happened at school a couple of months ago. (I was too lazy to post about it right away.)
I am a substitute teacher.
A lot of people, when they think of substitute teaching, especially subbing high school as I do, imagine some poor harassed soul dodging spitballs, attempting vainly to enforce some semblance of order, fighting to be heard over all the jeering, and wondering how her life went so wrong as to bring her here. There are definitely days like that, but fortunately these are few and far between (for me, anyway). I like being a substitute teacher and wouldn't mind continuing to be one for a few years yet if it paid better or offered benefits.
But anyway.
People don't tend to know that there is a lot of down time in subbing. Teachers have no way to know for sure who they're getting--or even if this person is familiar with the subject of the class--let alone whether this person is sane or competent. (Some subs are craaaaaazy! And is it any wonder with some of the crap we put up with?) Smart teachers learn fairly quickly not to assign anything to complicated. This means I spend a lot of time cooling my heels while kids watch a video, read, do worksheets, do bookwork, or just have a "study period." I wrote the rough draft to this blog entry while watching an English class write a timed in-class essay.
This is all a long-winded way of saying I get a lot of crocheting done at school. I read too, but the crochet is less attention-stealing.
And that is all to lead up to my story. We English majors can get wordy once we get going. We can't help it.
The story is this:
A while back I was scheduled to sub for the same class for two non-consecutive days in the same week. On the first day, I don't know, let's say it was Tuesday, I spent a lot of time working on my latest abomination (to be featured here when I finish it) and a little time explaining myself and my horrible creation to stunned students. ("I was in a hurry when I picked the yarn.")
That afternoon at the end of the day I found this under the front driver's-side wheel of my car:
How did it get there? Who was responsible? I don't know. The popular theory (popular with me anyway) is that some student who regards me as his or her favorite sub saw me crocheting in class and then saw the yarn matching my terrible project in the front seat of my car (I should leave yarn in my car more often), put two and two together, and took it upon him or herself to provide me with yarn that is more tasteful (defined as yarn that does not cause you to try to stab yourself in the eyes when you see it).
Why put this yarn under my tire?
I don't know. Kids are weird. Or maybe he or she put it on the windshield and it rolled off.
The other theory, let's call it "The Lame Theory," is that some other yarn enthusiast was carting yarn around the parking lot when a ball of it fell out of her arms or bag or whatever and happened to roll under my car. Let us put this silliness aside, shall we? I mean, that's a tall order to expect somebody to swallow. We all know people give thoughtful gifts to their substitute teachers all the time, right? Right???
Well, just because it's never happened before doesn't mean it can't happen now.
Just in case, I did bring the mystery yarn back with me to school that Friday, where it sat on my desk waiting to be recognized by a student who would either claim it or take credit for it. A couple of kids agreed that it was weird that I would find it under my car, but nobody fessed up to being responsible for its appearance.
So I tried. What else could I do? The yarn's mine now, and I still don't know how it got there.
Sims are slow little buggers.
If the yarn looks familiar it's because you have seen it before. This is the yarn I scavenged from all those sweaters. I still have tons left over.
The scarf itself is in the neighborhood of 11 feet long. I didn't use a pattern or anything. I just chained until it looked like I had a decent length (boy did I) and went from there.
I wanted a long scarf, but this is crazy long. If I hang it from my neck (without wrapping it around at all) it nearly reaches the floor. It's pretty wide, too, (8 inches) making it a lot of scarf to handle.
I haven't worn it out yet, but the rainy season is finally starting (here in December) so we'll see what happens.
Saturday, October 13, 2007
I have cold hands.
I think it's part of being tall. You have longer arms and legs so by the time your blood gets to your hands and feet it's not warm anymore. It's a rough existence, being a giantess.
Anyway, this last Summer I made my customary week-long visit to my grandmother who lives a few hundred miles south of me. She knits and even taught me to knit when I was a little kid, though I never got past making blankets for my Barbie at the time. She watches my crocheting and tells me how impressed she is because she could never get the hang of something so complicated. I watch her knit sweaters and things with these fancy designs and say the same thing.
We shop for yarn while I'm visiting, and that's fun. I like looking for yarn in a bigger town that has something resembling a selection, and she gets to look for yarn with somebody who doesn't hate looking for yarn. (My cousins, who do most of the driving for her, just aren't into it.)
All this buildup is to say that on my most recent visit to my grandmother's house this last summer I bought some yarn. Not having any particular project in mind for the yarn, I only bought two smallish skeins of each kind. I keep swearing I'll quit doing that because it's an awesome way to end up with lots of mismatched yarn and nothing to do with it, but I can't stop myself. When I got back to my grandmother's house I looked at all my yarn and thought, "What was I thinking? What's a project I can do with such a small amount of yarn?"
Well, here's the project:
Fingerless gloves. I love them, because, as I said earlier, I have cold hands. Mittens and regular gloves are great for warming your hands, but I like fingerless gloves better when I'm at home because when I wear them I can still type or crochet or play video games or read or whatever. I'm wearing a pair right now. It's great.
I wrote the pattern for these more or less by myself. I didn't have a glove pattern with me at all, but I've made gloves and mittens before and remembered the basic idea of how they went together. I had to come up with the numbers of stitches and what little shaping there was on my own. It took some trial and error. I was trying to make each glove take one skien. If you've done much yarn shopping you probably know what size skien I'm talking about. The sort of smallish medium size that a lot of novelty yarns come in. Just too small to do much useful with. I had to redo my first glove (one of the reddish ones) a few times to make the cuff shorter because I was running out of yarn. I like the cuff length now, even though it's not as long as I initially envisioned it. It's a convenient length.
The green and red pairs I made over Summer vacation. The last pair, shown below, I made once school started again. That's why it didn't get in the first photo shoot with the other two pairs. It was tardy. It's also the pair I'm wearing as I type this.
This pair has the distinction of being the only pair that came from a skien of yarn that was of a useful size. It's denim yarn and I am in favor of it, even though these gloves are less attractive than the other two pairs. They're sturdy and reasonably priced, at least. I got both of these gloves out of a skien of denim yarn and could probably have gotten another pair if I'd wanted to.
I guess I'll give you the pattern, now. I used a G hook. I'd say the yarn was on the skinnier side of worsted weight, though I can't tell you for sure because all three yarns came from those Commie yarn companies that don't actually tell you what the official yarn weight is, I guess so that if you get a pattern that asks for their specific yarn you can't fudge it with somebody else's of the same size. Jerks.
These gloves are made to fit me. If your hands aren't the same size as mine you'll have to work out how to adjust the numbers of stitches or the lengths to make it bigger or smaller on your own. Sorry. Also, I don't know what the gauge is. Try it out and if it doesn't look right, adjust accordingly. Again, sorry. I can tell you that if you want a longer cuff, just make your starting chain longer. You'll eat up more yarn this way, though, so watch it.
Anyway, here you go:
Using a G hook, ch 11, leaving at least a 10" tail
sc in each ch across
*ch 1, turn, sc in back loop of each ch across* until piece measures 6" (cuff made)
ch 1
sc 27 stitches evenly along the edge of the cuff piece and join at the first stitch to form a ring
sc in each sc around (marking the first stitch of each round) until you're 3 1/2" from the cuff
ch3. Skip 5 stitches (thumb hole made)
sc around in each sc around for 1 1/2 more inches.
Sew up the side of your cuff using the long tail you left at the beginning.
Weave in ends.
I don't really write patterns much, so I hope that was clear. If you're trying to make this and my pattern is nonsensical, go ahead and ask me about it in the comments.
Wednesday, September 12, 2007
Meet Pepito
The nice thing about being a crocheter is if you find your real friends to be lacking (looking at you, Tork), you can always make yourself some new friends to hang out with. This one is mine. His name is Pepito. I want you to try to guess what kind of animal Pepito is. Think about it.
 Wrong! Pepito is not a donkey! He is, in fact, supposed to be a chihuahua.
I know. He doesn't look like one. That's the least of his problems. Of greater concern are his lopsided ears, crooked nose, and, well, this is just pornographic: I won't label this attempt a failure partly because I like the little guy in spite of his troubles, but mainly because I don't think he's a failure on MY part. I blame the pattern. I'm sure the person who runs Katcrochet.com is a very nice person, but the pattern is translated from Japanese. The only reference picture is the straight ahead shot shown in the link, which hides a number of sins and some important information. There is no good way to tell how or where you're supposed to attach arms and legs and heads and tails and ears and things. Just a chart. A chart in Japanese. That's all.
So my new friend is a lopsided burro-perro with an anus. Thank you, Japan!
That pattern picture is so misleading. There is a reason all the pics so far have featured either me holding Pepito myself or laying him on the floor. This is why: Rise up and walk, Pepito! Walk!
 Oh. Never mind.
Poor Pepito. He's face heavy. His little spindly hollow legs cannot hold him up. Poor little donkeydog.
But you know, when I think about it I realize this is not the first time a donkey has appeared unbidden in my world. Could Pepito be the second manifestation of Jesus's donkey? The very donkey whom Man's Savior rode around on Palm Sunday? Maybe it is. Maybe God is trying to tell me something.
Maybe Pepito would be able to stand up if he had Our Lord on his back to offset the weight of his huge noggin.
Oh well. I'll close with a picture of Pepito in his natural state, one of repose.
I love you, Pepito.
Wednesday, April 25, 2007
I love to make 'em Shrink!
And now for a blog entry that has absolutely nothing to do with crochet! Instead we'll be talking about something else that is very near and dear to my heart. Shrinky Dinks.
I miss the hell out of Shrinky Dinks. Back in the 80's they were big and they were so much fun. A simple Google search will fill you with hope that it may be possible to find Shrinky Dinks now, should you dare to look. BS. They're gone and they're not coming back. (They're not coming to my town, anyway.) The world mourns.
Except that I was recently at a local pet expo and I saw these:
And the world rejoiced.
Yes, these are Shrinky Dink pet tags. Awesome. Open up the package, and this is what you get:
As you can see, they already colored in most of the tag for you, so it's not exactly like the old Shrinky Dink experience. With the old Shrinky Dinks you'd color the thing in yourself, and since you were probably a little kid like I was the coloring job may not have been fantastic. Nevertheless, through the magic of shrinkage the coloring would look really awesome when the whole process was said and done.
I wouldn't get that exact experience, but it would be something close. Instead I had to try and write information for my pets on the three tags. The dog tag was easiest, as it was also the biggest. I was able to squeeze my whole address on there. The cat tags were tiny and it was impossible to get any information other than the cat's names and my phone number on there.
While you're struggling to write tiny writing with a Sharpie pen, you're supposed to be preheating these cardboard squares. Something gross fell in the bottom of the oven recently so this Shrinky Dink experience was a smoky one.
The tags are ready to go in. I hope you're not incredibly offended that I blurred out my personal info. Stalker.
I tried to take pics of the tags in the process of shrinkage, but the door to the oven is just dirty enough that you can't see much. Oh well. Here they are coming out of the oven:

If any of your tags are curly, you're supposed to flatten them out with a spatula. So I did.
You can't see it because of my Paint Shop skills, but my writing totally shrunk up tiny. Still readable, though, except for Oscars where it was really hard to fit my phone number in there.
This was the hard part. Well, this and the writing of the address. You can just barely see it, but this is the part where I put a clear plastic sticker over the top, I guess to keep the address from scratching off. There's not a lot of room to work with, so I was scared I'd get it all crooked.
The sticker for Mindy's tag was too small to cover the whole address. Cheap bastards!
Here's the finished product, which will show up on your screen about the same size as they are in real life. Now I just need to get some pliers so I can affix the hardware.
This didn't quite fill my cravings for a real Shrinky Dink experience, but beggars can't be choosers. It was still fun.
Mindy, the dog, is turning 4 today, so happy birthday to her. Yay!