Today my buddy Tork told me that I should take up needlepoint. As if I don't already have a craft that I can use to construct completely sweet things he can't even figure out. Yeah, needlepoint is cool, but I can only concentrate on so much at once.
Besides, crochet allows me to make awesome things.
Recently I created the Awesomest Thing I Ever Made. It has even unseated the previous Awesomest Thing I Ever Made, which you haven't seen since I never got around to taking pictures of it.
I got a couple of pictures of the new thing, though. This, in case you can't tell, is a cat tunnel. I bought five 11 (or so) inch brass rings and crocheted around them to construct this thing for my cats to run though.
This wasn't my idea, by the way. I got it from pictures of one that somebody else posted. The "pattern" I used* recommended 9" rings, but my cats are fatasses and I didn't really see how they'd be comfortable in a tunnel that small. I think the size rings I got came out just about right.
*I looked at a pattern, but you don't really need one for this. If you have any experience with crochet you can do it. There are 14 rows between each ring, alternating half double crochet and double crochet. That's about as much pattern as you need, and that much structure isn't even necessary.
So I made this thing over the course of many weeks and finally set it out for the cats fully expecting them to ignore it forever.
Two of them did.
But sweet dumb Felix decided to make it his second home.
Sorry about the censor bar. My blog is cursed. Pets whose pictures I post tend to disappear forever. I like having Felix around, he appreciates my art, so I had to take steps.
I'm really happy with how this came out. It used up a lot of scrap yarn that I had lying around (much of this yarn was remainders of previous projects featured on this blog) and got to make a cool place for Felix to hide from my dog. It's really awesome and I'd recommend this project to any cat owner who crochets.
Wednesday, November 19, 2008
In Your Face, TorKnocker
Wednesday, August 20, 2008
I made a cake!
It's my dad's birthday today, so I baked him a cake. This one is different than the cakes I usually make, though. This time I wanted to break out the bucketloads of food coloring and attempt a rainbow cake.
I made the cake batter itself from a boxed mix. It was lemon cake mix because lemon is my favorite kind of cake. (Dad probably would have preferred chocolate, but it's hard to dye a chocolate cake and make the color show up.) I knew I'd be working against the yellow of the original cake batter going in, but boy howdy! Betty Crocker uses some heavy duty damn food coloring in her cakes! She does NOT want you screwing around with the colors!
I did anyway. I also made a huge mess doing it. It was fun.
I told wurwolf about it and she told me to take pics, so now you get to see me frosting this cake.
Yeah, I'm frosting these on the washing machine. Behold its ancientness. The kitchen is pretty small and kind of a mess and there wasn't room.
That cake on the right looks pretty scary, I know. Some colors weren't meant to be golden, brown, and delicious. Green is one of them.
Eww. And so is purple. The cake is fine, though! It's just the food coloring! There is no mold present in this cake! I just baked it today!
The other layer looks much better as it is where I stored my warm colors. The greenish bluish purplish layer goes on the bottom.
Though the cake came from a boxed mix, the frosting was made from scratch. I don't cotton to canned icing. This stuff is just butter, a LOT of powdered sugar, a little vanilla, lemon zest, and enough lemon juice to make it spreadable. It's good stuff. I considered making the frosting some unholy color, but I figured there were sufficient weird colors involved already.
Middle part frosted!
Top layer is on! I know that you're supposed to put the top layer on upside-down to make the top flatter. Hell with that. It's too easy to tear up the top of the cake that way. Besides, the colors would show up in the wrong order if I did it that way. (Assuming they show up at all... I won't know if this worked until the cake is cut. This is scary.) The idea is you put a TON of frosting on top, and then push it over the sides to frost them.
I'm not left handed. I was only holding the spatula in my left hand so I could take the pic with my right. I knew you were wondering. Over the side it goes! Now to smoosh it around there!
 ALWAYS remember to dip your mp3 player in your frosting! THIS IS A VERY IMPORTANT STEP, PEOPLE!!
The cake is pretty well frosted, but I still have a lot of icing left. On it goes.
(I learned long ago that "Holy shit that's a lot of icing!" is way better than "Dammit, I ran out of icing and now I have to make more!" The icing recipe I've always used never makes quite enough to frost a whole cake. Doubling it yields way too much. It's better than trying to figure out the numbers for one-and-a-halfing it, though.) Mmm. More for the cook. (And you guys can totally have some, too. Totally.)
 Pull the parchment out of the bottom and I'm done! Hooray!
 As important as the cake itself is the Cake Barricade. This is a vital ingredient that keeps your cake from being devoured by roaming packs of wild dogs (or one determined poodle). I'd say we lose at least one cake a year to poor guarding and bad dogs.
So... You want to see this thing cut open?
Me too!
But it's pretty rude to cut up a birthday cake when the birthday person isn't present and ready to eat, even if you did make the cake yourself. You'll have to wait. It is only at the moment that I slice this thing that I will discover if my experiment worked.
I can hardly wait!
UPDATE:
It's a few hours later now, and we've cut the cake. Let's see what we've got!
This is a special cake cutter dealie some lady gave me. It's not really worth it most of the time, but it does help me with those First Slice Jitters. That first slice always comes out crappy! Ok, we've got a few pieces out of there and check it out! Looks good, especially when you think about how scary it looked without the icing and all. That's not icing dribbling down the middle. Well, it is icing, but it's not dribbling down. There's a crack in the cake and it's just in there. Whoever gets the piece with the icing trench is the winner of the cake!
 I pretty much got the effect I was hoping for. The six colors go down in layers in the proper order from red to purple. I could have swirled them together, but I wanted to see how it would turn out this way. I'd have liked the layers to be a bit flatter and more even, but I'm cool with the wavy effect, too. I'm just glad the colors didn't bleed together!
So there you have it! I'm going to consider this cake a success. By the way, wurwolf and I were talking about whether my Dad would appreciate all the extra effort that went into the colors and stuff. I can tell you that, as expected, Dad's reaction to this cake was the same as Dad's reaction to every other cake I've made him, whether it was good or disasterous:
Hey! Cake!
Wednesday, March 26, 2008
My Grandmother had a Cat Named Socks
He was a real booger, too.
(By the way, I'm testing out a new blog editor, so things may or may not look or act weird. So if the blog's screwy, this is why.)
So the title is just a "clever" way to say I made some socks. I've made them before, and always planned to make more. Now I've finally gotten around to it. Both pairs I'm showing you today I made while at school. It's a convenient time to make smallish things.
The first pair is the project I mentioned before, that used horrible atrocious yarn. Take a look at the finished product:

Scary, huh? I think so. But as I told my horrified students, (the sensible ones were horrified, anyway, there's always one or two who will say, "I think they look awesome!") it's not like I'm planning to wear them to the Queen's Garden Party. They're slipper socks to wear around the house, pretty much, and they work fine for that.
Making these socks was mostly pretty straightforward. I do have one nit to pick, and that's that the people who wrote the pattern are under the impression that women do not have calves. The cuffs go in a straight tube up from the ankles leaving no room for the natural curve of a woman's leg. Yes, the stitch used on the cuff is stretchy, but it's not that stretchy. It took me a long time to finish these socks because I knew if I just stitched up the cuff like I was supposed to I'd never be able to wear them, and I was undecided on how to go about solving my problem. I thought about a couple of options with creative lacing and whatnot, but in the end I just went back in with my hook and added to the cuff. They're pretty comfortable, now.
The little colored thready worm looking things are a part of the yarn, lest you think (like some of my students did) that I went in with a needle and thread and added each one individually by hand.
 As you can see, it's just regular yarn and there's this colored thread in there that every so often emerges in this brightly colored protrusion.
It seemed like a good idea when I was buying it, and I'm sure this kind of yarn has its place in the world, but it didn't thrill me while I was working with it. Not great sock material. As I mentioned in my previous blog entry, I was in a hurry the morning I decided to use this for my new sock project.
I know those thread tumors look like they'd be uncomfortable to wear, but fortunately they seem to naturally form on one side when you're crocheting in the round. You just have to make sure that side is the outside. Observe:

That's the inside of my sock, and while I had yarn maggots appearing on the inside of the cuff, on the darker part where I was crocheting in the round they all stayed on the outside where they belong. These socks are pretty comfortable as long as I don't do lots of marching around in them, which I wouldn't because look at them:
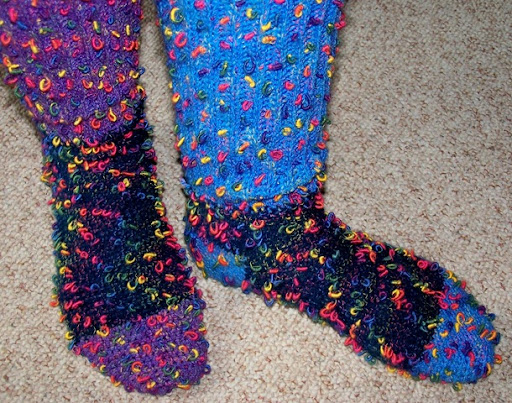
And now, to prove that I'm capable of making things that are not horrible, my other pair of socks:

I absolutely love the yarn I used, though it's too expensive for me to make anything big out of. It's even more colorful than what you can see in these pictures, with the yarn being made up of three strands of differently colored variegated yarn that nevertheless seems to work together to make a nice rainbow effect. The pattern goes for so long, though, that you can go through a whole ball of yarn and not get back to the color you started with. This can make it hard to change yarn seamlessly, as you can see in the toe of the right sock and just after the heel in the left sock.
(I still had plenty left in my yarn ball when I changed yarns for that left sock, but it was all coming out so dark and so... green! I wanted something brighter and with less greens in it. And then the new skein, after being nice and orange for a few rows, had to go right back to the green again. Doh!)
This is awesome yarn, even if the skeins never match even when they come from the same dye lot. You should buy some:

True story. My 12-year-old (half Mexican) cousin was feeling all full of himself and snarky, as 12-year-olds often do. He asked me to show him what I was working on and looked at the yarn and we had this conversation:
The Boy: Eww! Your yarn smells!
Me: That's because it's Mexican!
The Boy: Um... I was just kidding. It doesn't actually smell. I was just saying that.
Ha! That's how you put an insecure adolescent who is testing out his sense of humor to get a feel for what's funny for the first time in his place!
The yarn isn't actually Mexican, by the way. The label says it was manufactured in South Africa, so I guess in a way I just played Sun City. I love these socks.
 I used the same pattern on these that I did on the other socks. This time, though, I knew ahead of time that the cuff would be a bastard. In order to fix the problem before it became a problem, this time I made the cuff shorter. It's only half as long as the pattern tells me to make it, and so these socks fit perfectly.
As a side note, I never tried these socks on until I was taking the pictures for this blog entry. They fit really well, though, and I'm still wearing them right now.
Socks!
Read more!